Monday, April 29, 2013

FCCB 158 - Paper Roses

Good morning and happy Monday!!  Monday means time for another fun challenge over at Fantabulous Cricut!  This week's challenge is Paper Roses - we want to see your projects with paper flowers on it.  I made this Mother's Day card for my sweetie's step-mother.


I got these fabulous Teresa Collins papers from my good friend and DT sister Missy.  Beautiful colors and patterns that can be used for so many occasions - thanks Missy!!


The flower was cut from the Flower Shoppe cartridge in multiple layers then curled by hand to give it more dimension.  A pearl in the center and a double bow tied from crinkle ribbon finishes it off.  I kept the rest of the card pretty simple so that the focus could be the pretty flower.

Thanks for coming by to take a look at my card!  Be sure to link up your projects with paper flowers to the challenge at FCCB by Sunday evening.  I'm looking forward to seeing your creations!!

Recipe:
Cardstock for card base from Recollections
Pattern papers from Teresa Collins's Sweet Afternoon stack
Flower from Flower Shoppe
Labels Four dies from Spellbinders
Sentiment from My Pink Stamper's Happiest Moments set
Crinkle ribbon
Pearl gem

Sunday, April 28, 2013

CAS Belated Birthday

Happy Sunday!  I hope you are all enjoying your weekend!  We had a rainy start to our weekend here, but today looks to be a beautiful day.  I spent a good bit of my afternoon and evening crafting with a good friend yesterday - great way to spend a grey/rainy day!  Today I plan to enjoy the sunshine and get out and play some golf.

The past few weeks have been pretty busy for us and unfortunately I got a little behind and missed a couple birthdays.  I decided to combine this misfortune with the challenge over at Celebrate the Occasion.  A fun challenge is always a good way to help get the creative juices flowing and get back to crafting, I think!  The challenge at CTO this week is Clean and Simple (CAS).  This is what I came up with for one of my belated birthday cards......


I embossed my background paper, then popped up my sentiment which I stamped and framed on shapes cut from Spellbinders dies.  Quick, clean and simple!


Thanks for coming by to take a look!  Enjoy the rest of your weekend!!

Recipe:
Cardstock from Bazzill
Floral Flourishes embossing folder
Labels Eight dies from Spellbinders
Sentiment from Scrappy Moms Stamps Everyday Greetings set
Ribbon from The Paper Studio

Monday, April 22, 2013

FCCB 157 - 3D

Happy Monday!  I hope you all had a wonderful weekend!!  It's time for another fun challenge over at Fantabulous Cricut!!  This week we want to see your 3D projects.  My project this week has a bit of a story to it, so I'll apologize up front for being a bit long-winded today.

As many of you know, I am a runner.  I love running races of all distances, but particularly marathons and half marathons.  Running the Boston Marathon is a dream of mine, and is the dream of many marathon runners.  The events that happened just one week ago really hit home for me.  I might have been there; my husband and parents might have been spectators somewhere near the finish line.  I never thought I would say that I was glad I didn't qualify for the Boston Marathon, but a week ago, I was glad I hadn't.

A good friend in my running group had, however.  She had trained so hard; we carpooled to speed sessions on Tuesdays and to long runs on Saturdays.  Finally, she achieved her dream of qualifying for Boston.  She was so excited to make the trip with her husband, one of her daughters and her son-in-law.

I got an email from a friend last Monday afternoon that was followed within minutes by a phone call from my husband.  Both wondering if I'd heard about the bombs, both wondering if our handful of friends and their families were okay.  I immediately hit the internet, trying to find any information I could.  I logged in to Facebook, looking for updates from friends.  I tried to call my good friend and left a voicemail; I also sent her an email thinking cell service may not be good as so many people would be trying to make calls.

I had to wait over 3 hours before seeing an update on Facebook that she and her family were okay.  A few hours later, she called me to tell me herself and to fill me in on her experience.  What an emotional day for her and her family!

There were three women from my running group who had qualified for Boston but were not able to finish.  Our running couch spoke with the organizers of a local marathon that took place this past Saturday.  They arranged for these 3 ladies to be able to run the last seven-tenths of a mile (the distance they were not able to run to complete the Boston Marathon) at the marathon here in town.  While it's not quite the same, it still meant a lot to these ladies.

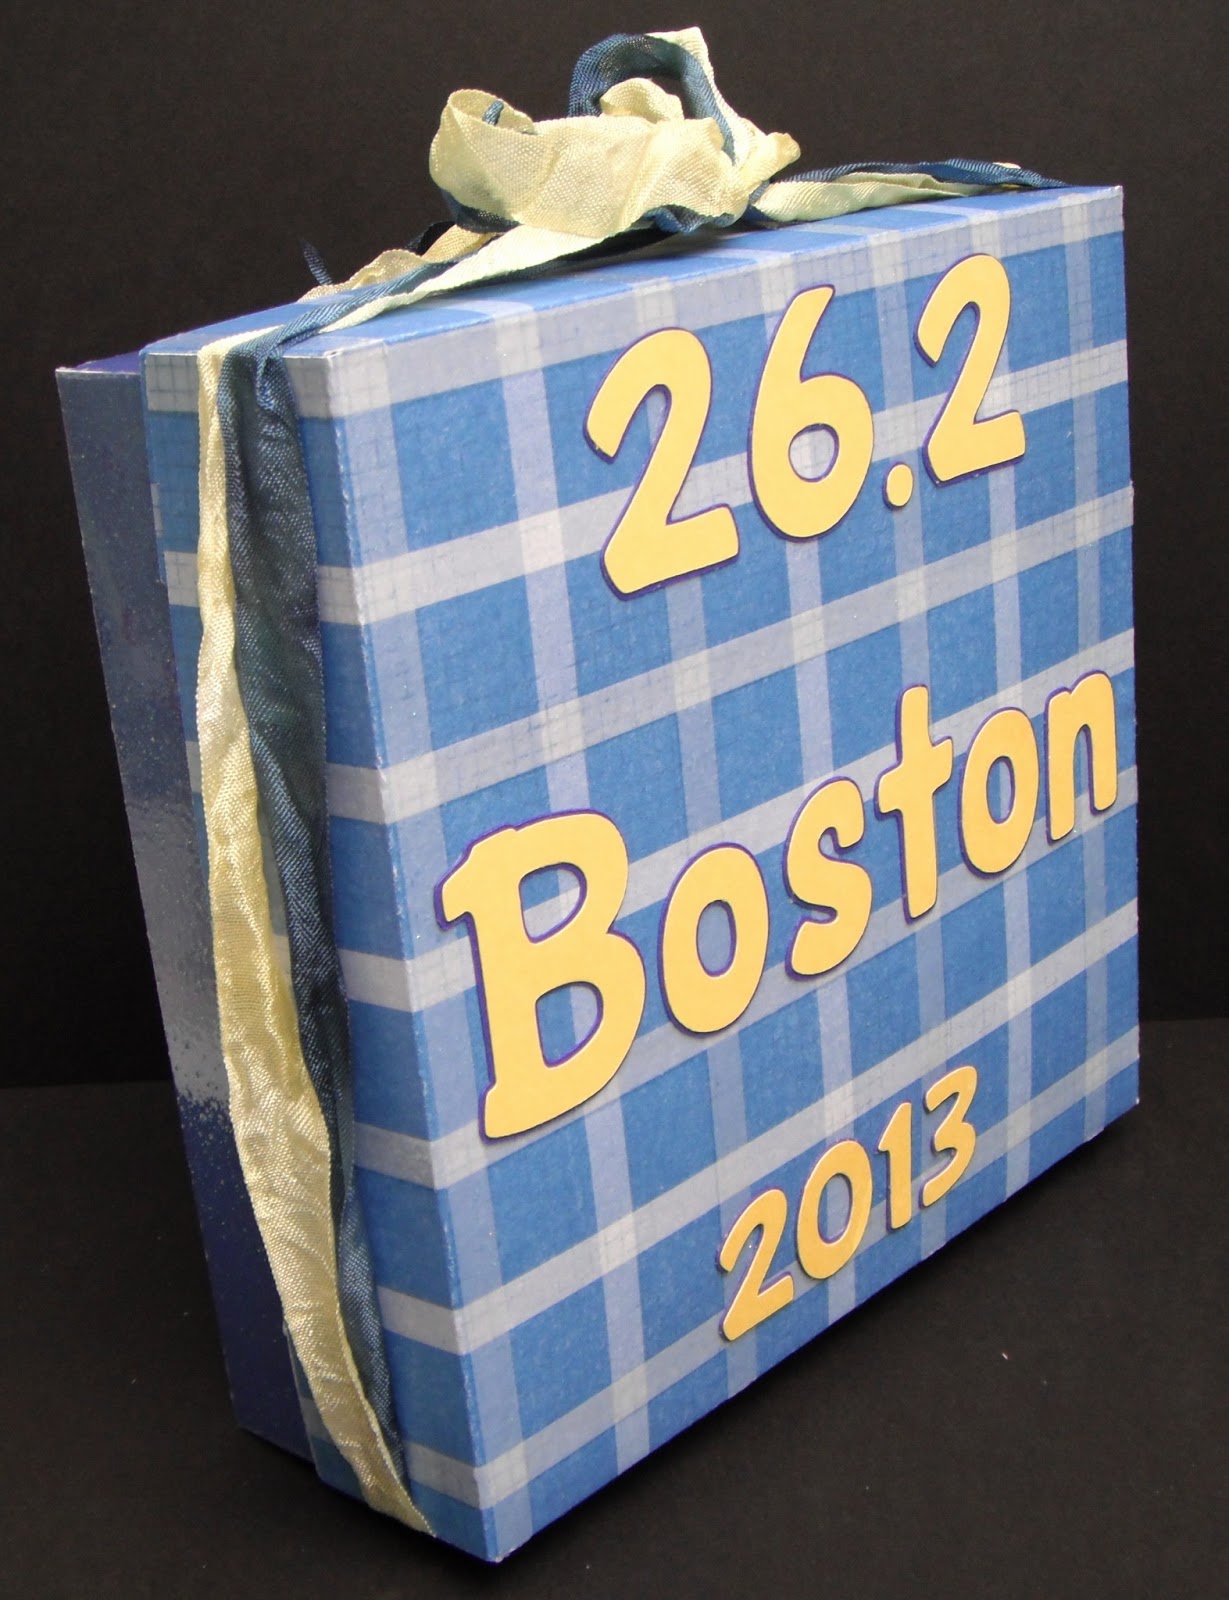
A number of runners from our running group went to the finish line of the local marathon to cheer the ladies on as they "finished" their race.  I wanted to do something a little special for my friend and decided to make her a few cupcakes, frosting them in blue and yellow, the colors of the Boston Marathon.  I made a box for the cupcakes using the Sweet Tooth Boxes cartridge, and personalized it a bit using the Pooh Font cartridge.  I tied blue and yellow crinkle ribbon around the lid because I thought it needed a little something.


On the inside, the insert to hold the cupcakes was a little taller than I wanted.  I trimmed about 1/2 inch off each side so that the tray would sit a little lower in the box, which allowed the cupcake to sit on the bottom of the box and gave room for a bit more frosting on top.  :-)


Here's a picture of the chocolate cupcakes with the blue and yellow frosting.  I hope she liked them!!


Again, I'm sorry for being long-winded today.  Be sure to link up your 3D projects over at Fantabulous Cricut this week.  I can't wait to see what you create!!

Recipe:
Cardstock from DCWV
Box and cupcake tray insert from Sweet Tooth Boxes cut at 11 inches
"Boston" from Pooh Font cut at 1.8 inches
"26.2" from Pooh Font cut at 1.5 inches
"2013" from Pooh Font cut at 1.2 inches
Crinkle ribbon

Sunday, April 21, 2013

Golf Cake

Happy Sunday!  Yesterday was my sweetie's birthday.  He loves golf and decided he wanted to get a group of people together for a mini-tournament of sorts.  There were 12 of us that played golf yesterday afternoon.  It was a little chilly and pretty windy, but we all had a good time.

I, of course, had to make a cake for my sweetie.  I thought a golf-themed cake would be perfect, so I searched online for some ideas.  I found a number of fabulous golf cakes and took some ideas from a few of them to come up with this design.


I made a chocolate cake and a double batch of buttercream icing.  After frosting the entire cake, I made the grass around the putting green on the cake using a star tip.  I must say - my hand hurt making all those stars!!    I made the flags for the side of the cake out of red fondant, simply cutting small triangles.  To make the flag on the pole, I cut a diamond of red fondant and wrapped it in half around a lollipop stick.  The tiny golf ball is a small ball of gum paste.


My cake decorating skills could use a little practice, but I was happy with how the cake turned out and my sweetie loved it.  That's all that matters to me!!

Enjoy the rest of your weekend and thanks for coming by to take a look!!

Monday, April 8, 2013

FCCB 155 - Color and Shape Challenge

Happy Monday!  I've been MIA this past week because I was visiting my parents down in the Phoenix area.  I promise to do some catching up on everyone's blog in the next day or so though!!

It's time for another fun challenge over at Fantabulous Cricut!  This week we're having a color and shape challenge.  We want you to use the color yellow and a triangle somewhere on your project.


All of my cardstock was printed using the Better Together Imagine cartridge.  I got my triangles from the bird on the banner image on Birthday Bash.  I simply cut the bird off and cut the triangles apart so that I could play around with them to get them to fit on my card the way I wanted.

I stamped my letters on the banner, then glued the tops of the triangles to brown twine and attached twine bows to both ends using glue dots.

I'm looking forward to seeing your creative creations using the color yellow and a triangle shape!!

Recipe:
White cardstock colored using Better Together
Banner from Birthday Bash cut at 3.2 and 3.45 inches
Fiskars Basic Font stamp set
Brown twine

Monday, April 1, 2013

FCCB - April Fools Day Cricut Crawl

It's April Fools Day!  Has anyone tricked you with a joke yet today??  It's also Monday again and that means another fun challenge over at Fantabulous Cricut!!  This week we're doing things a little differently and we're hosting a fun Cricut Crawl along with our challenge.  This week is all about April Fools Day - be sure to include a joke on your creation!!

I decided to make a fun slider card for this challenge.  This was my first attempt at this type of card and I love it!  I'm going to be making more of these in the future for sure!  I found a great tutorial HERE with easy-to-follow instructions and pictures.

When you pull the slider up, this is what you see:
I tried to get a picture that will give you a better idea of what the card looks like when it's open.....
If you haven't made one of these cards before, give it a try!  They're easy to make and they're a fun change!!

Be sure to check out all the other DT member's funny creations and join in the fun!  I'm looking forward to seeing your projects!!

Recipe:
Cardstock from 3 Bugs in a Rug Ellie stack
Elephant from Animal Antics cut at 1.5 inches
Frames are Spellbinders Lables Four dies
Crinkle ribbon
Black and white Sakura gel pens