Happy Wednesday!
The project I have to share today is a card I made for my dad. Today is his birthday! My dad loves camping and hiking. I thought there were so many cute images on the Campin' Critters cartridge, and finally bought it a little while back. I know this isn't a 'traditional' birthday image, but I thought my dad would like it. This is the first time I used the cartridge and can't wait to make more projects with it - love all the images it has!!
Hope you're all having a wonderful week! Thanks for stopping by!
Recipe:
Cardstock from Bazzill
Trees from Campin' Critters cut at 3 3/4 inches
Moose from Campin' Critters cut at 2 1/2 inches
Chalk around the edges of the trees
Pop dots for the moose
Wednesday, November 30, 2011
Monday, November 28, 2011
Party Like a Rockstar
Good evening! I hope everyone had a nice holiday and weekend. Did anyone find any great Black Friday or Cyber Monday deals?? I didn't do any shopping over the weekend, but I know there were quite a few deals out there!
The project that I have to share tonight is a birthday card for my brother. My brother played the guitar as we were growing up, and he still enjoys playing from time to time. When I saw the rocker guy on the Everyday Paper Dolls cartridge, I immediately thought him. Here's the card I came up with. Thanks to my good friend Melissa for the idea of tying strands of embroidery thread to the guitar for the strings!!
Patterned cardstock from DCWV
Rocker guy and guitar from Everyday Paper Dolls cut at 3 1/2 inches
Ribbon from my stash
Face from Peachy Keen Stamp's Everyday Character Face Assortment set
Sentiment from Pink By Design's Rock On set
Embroidery thread, Glossy Accents, white Sakura gel pen
The project that I have to share tonight is a birthday card for my brother. My brother played the guitar as we were growing up, and he still enjoys playing from time to time. When I saw the rocker guy on the Everyday Paper Dolls cartridge, I immediately thought him. Here's the card I came up with. Thanks to my good friend Melissa for the idea of tying strands of embroidery thread to the guitar for the strings!!
Recipe:
Solid cardstock from Bazzill and RecollectionsPatterned cardstock from DCWV
Rocker guy and guitar from Everyday Paper Dolls cut at 3 1/2 inches
Ribbon from my stash
Face from Peachy Keen Stamp's Everyday Character Face Assortment set
Sentiment from Pink By Design's Rock On set
Embroidery thread, Glossy Accents, white Sakura gel pen
Thursday, November 24, 2011
Happy Thanksgiving!
Happy Thanksgiving everyone! I hope you all had a fabulous holiday!! My sweetie and I went out to one of his uncle's and enjoyed the day with his family.
My post today is of the dessert I made to take with us. I got the recipe for these Pumpkin Cupcakes with Cinnamon Cream Cheese Frosting from my good friend Missy, who got it from Robyn aka My Pink Stamper. I won't post the entire recipe here, but you can click on either of their names and you will be taken to their pages with the recipe. I will tell you though..... I made the recipe as listed for the cupcakes (which is a double batch) and made 48 cupcakes and an 8x8 cake (it was thin, but still an 8x8 cake!!). I also made the recipe as listed for the frosting (which is a single batch). However, the single batch of frosting iced all of my cupcakes. Maybe I was a bit skimpy with the frosting?? I also did not make my cupcakes very big. I think they were a good size for a large holiday gathering though - enough to get a good taste, but not so much that you feel TOO guilty when you eat it after a large meal... along with a slice of pie, some cookies, etc.... LOL!
The cupcakes got good reviews from my sweetie's family, so give them a try sometime! Here's a pic of a few of the ones I made. Happy Thanksgiving!!
Wednesday, November 23, 2011
Thanksgiving Card
Happy Thanksgiving Eve! I hope everyone is ready for the holiday and is able to spend time with friends and family in the coming days. Today I'm sharing the card I made to send to family for Thanksgiving (yes, I took the 'easy' way out and made the same card for everyone!).
Have a wonderful holiday and thanks for stopping by!
Recipe:
Solid cardstock from Bazzill and Recollections
Patterned cardstock from The Paper Studio
Turkey from Create a Critter cut at 3 1/4 inches
Sentiment from My Pink Stamper's Happiest Moments set
Twine from My Craft Spot
Google eyes
Black and white Sakura gel pens
Sunday, November 20, 2011
Housewarming Card
Good morning everyone! I hope you're all having a wonderful weekend. Yesterday evening, my sweetie and I went to a housewarming/birthday party for a good friend and co-worker of mine. It was an evening full of good food, drinks and a lot of laughs with great friends. This is a quick card I put together for them celebrating their new place.
Recipe:
House shaped card with all the layers from Wild Card cut at 8.69 x 5.50 inches
Swiss dots Cuttlebug embossing folder
Brown chalk ink
Black Sakura gel pen
Black iRock gem
Recipe:
House shaped card with all the layers from Wild Card cut at 8.69 x 5.50 inches
Swiss dots Cuttlebug embossing folder
Brown chalk ink
Black Sakura gel pen
Black iRock gem
Thursday, November 17, 2011
A 'Different' Happy Birthday
Happy Friday eve!! I'm ready for the weekend to start. I'm looking forward to working on some projects and getting ready for the start of this wonderful holiday season! I hope all of you have some great plans for the weekend as well!!
The project that I have to share today is a slight departure from my usual style. A good friend and co-worker of mine celebrated his birthday today. He's very into skulls, crossbones and such, and I wanted to make a card that went along with that. So, I found this image on the Indie Art cartridge and this is what I came up with. A little scary some may say, but I think he'll like it.
Recipe:
Cardstock from Bazzill and Recollections
Skull with splash background from Indie Art cut at 3 1/2 inches
Tiny Bubbles Cuttlebug embossing folder
Glossy Accents on skull and some of the dots in the background
Stickles on some dots in the background
Sunday, November 13, 2011
Fluttering by to say Hi!
Hello everyone! I hope you had a fantastic weekend! Our weekend was busy, but good. It was a 3-day weekend, which always makes it a little better. My sweetie's father got married on Friday night, so we were pretty busy Thursday, Friday and Saturday with wedding related/family stuff. The wedding itself was beautiful and went pretty smoothly. No complaints from the bride and groom, and that's all that really matters!
The project I have to share tonight is a card that I made for a friend who is starting a new job tomorrow. She is married to one of my co-workers and is coming to work for our company but in a different department. I know that she is really looking forward to this change and wanted to give her a card just to let her know I'm thinking about her on her first day and wishing her all the best. Thanks for coming by to take a look!
Recipe:
Cardstock from Bazzill
Butterfly from Rock Princess cut at 3 1/4 inches
Sentiment from Pink by Design's Rock On set
Ribbon from American Crafts
Spots & Dots Cuttlebug embossing folder
Cloud Crop-a-Dile Corner Chomper
Clear Dust Sakura gel pen
iRock gems and pop dots
Tuesday, November 8, 2011
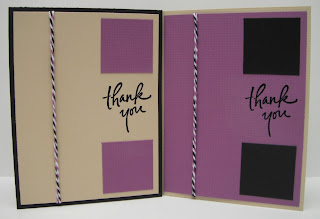
More Thank Yous
Hello! I'm happy to report that I finished the thank you cards for my sweetie's father and his wife-to-be. They stopped by to pick up the cards and they loved them! They were so thankful that I took the time to make the cards for them so quickly and they both said they were so much more than they were expecting. They also said something that really meant a lot to me and was probably the best compliment they could have given - they told me that they liked them so much that they didn't want to give them away. I'm just so happy that I could do this for them and add a small touch to their special day.
Here's the second batch of cards. Thanks for stopping by!
Girl thank yous:
Guy thank yous:
Here's the second batch of cards. Thanks for stopping by!
Girl thank yous:
*I ran the paper through my Texture Boutique, then traced over the swirls with Glossy Accents. I wasn't sure how it would turn out, but I love the effect!
*I was informed by the boys that this card reminds them of garters.
Not my intention!!
Guy thank yous:
Sunday, November 6, 2011
Thank Yous
Good evening! I hope everyone had a great weekend. My weekend was busy, but fun. I got a text message last Thursday from my sweetie's father, who is getting married on Friday. He was wondering if I would be willing and able to make 23 thank you cards for them in time for their wedding. Of course I agreed - why would I turn down a reason to play in my craft area?!?
They came over that evening and picked out paper that matches their wedding colors and left the rest up to me. Their only requests were that they wanted 11 'male' cards and 12 'female' cards, and they want them to all be different. I took a small liberty and decided that the same design but different colors counts as different. Thankfully they are okay with that!
I got started on a few cards that night and then on Friday my sweetie and I went to Ames, IA to meet up with some college friends and then watch my Cyclones take on the Kansas Jayhawks on Saturday afternoon. With the exception of the trip to Ames for the football game and a few hours this afternoon for a bridal shower, I have done little else this weekend other than working on the thank you cards. But I'm not complaining! I've enjoyed making all these cards. I have quite a few done, but still have a little way to go. This is the first batch of cards I have ready to share with you. Thanks for coming by to check them out!
Girl thank yous:
Guy thank yous:
Thursday, November 3, 2011
Family Picture Frame
Good evening! Can you believe it's already November?? I sure can't. This year has absolutely flown by! Before we know it Thanksgiving (and Black Friday shopping!) will be here, with Christmas right around the corner and then we'll be welcoming a new year. I'm looking forward to the holidays already and spending time with family and friends. Which leads me to the project I have to share tonight....
My great friend Melissa and I bought picture frames a while back, thinking we could decorate them for all kinds of occasions. She has made a couple of great picture frames and I had yet to make one. At a recent scrap night at her house, I was flipping through a new stack of paper I had bought and found a patterned paper that I really liked, so I decided it was finally time for me to make a frame. I think my mind was on the holidays and spending time with family that night. Now I just need to make sure I get a good family picture this holiday season! Thanks for stopping by and a big thanks to Melissa for all her help figuring out how best to place the paper and for my lesson in using mod podge!!
Recipe:
Solid cardstock from Bazzill
Patterned cardstock from DCWV
'Family' from Home Accents cut at 1 1/2 inches
Pearls, placed using swirl iRock template
Mod Podge
Subscribe to:
Posts (Atom)


