Monday, May 20, 2013

FCCB #161 - Oh Baby!

Good morning and happy Monday!  I hope you all had a great weekend!!

Monday means another great challenge over at Fantabulous Cricut.  This week's challenge is Oh Baby!  Create any project for a new baby, just be sure to use your Cricut!!

I don't know anyone who's expecting right now, so I thought I'd make a couple simple baby cards to have on hand so I'm prepared should the need arise.


I used 9 Months and New Arrival for my onesies.  I added a little glitter to the flower on the girl onesie and to the duck on the boy onesie.


I finished each card off with twine tied through a button, and a few crystal gems.


Be sure to link up your baby projects to Fantabulous Cricut by this Sunday evening!  I'm looking forward to seeing your creations!!

Recipe:
Solid cardstock from DCWV and Recollections
Pattern cardstock from Teresa Collins Sweet Afternoon pad
Girl outfit from New Arrival cut at 3.75 inches
Boy onesie from 9 Months cut at 3.75 inches
Sentiments from My Pink Stamper's Everyday Life and Fabulous Phrases sets

Twine from The Twinery
Buttons from my stash

Crystal gems
Glitter

Sunday, May 19, 2013

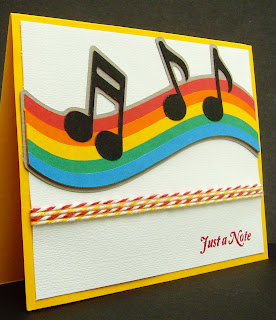
Just a Note

Good evening!  My sweetie and I had a pretty busy weekend, but I managed to sneak downstairs and craft a little bit this evening.

Over at Die Cuttin Divas this week, the challenge is Over the Rainbow.  Well, I recently bought the digital version of the Groovy Times cartridge and decided it was time for me to play with it.  I knew there were some fun images on that cartridge that I could use for this challenge.  I have played around in Cricut Craft Room a little before, but I have never actually cut anything.  So this evening I decided I'd give it a shot.  Turns out, it's pretty darn easy!!


I made a simple card to add to my stash.  I figure you never know when you might need to write a quick note to someone!


Thanks for coming by to take a look at my creation!

Recipe:
Cardstock from Recollections
Rainbow and notes from Groovy Times cut at 2.43 inches
Sentiment from Pink by Design's Rock On set
Twine from The Twinery

Friday, May 17, 2013

Wedding Album Cover Page

Happy Friday!  This has been a busy week for me and my sweetie and I have some fun plans for this weekend, so I'm doubly excited for Friday this week!!

As you may already know, I've been trying to get caught up on some of my scrapbooks lately.  One of the albums I've been slowly working on is an album of wedding pictures that family and friends took.  Faith Abigail did a wedding album series just a little while back.  I think she puts together fabulous layouts and was so excited to see her wedding album series since I'm working on my wedding album.  She put together a fabulous cover page for the album that you can see HERE.  When I saw her cover page I knew I was going to be scraplifting her design for my wedding album - I just loved it!


I basically kept all of the elements the same.  I think the only thing I changed was the font for our initials and the papers.  I really like the soft colors in the My Mind's Eye Lost & Found 3 papers, so I've been using those throughout my album. I recently placed an order for some scrapping supplies that includes some papers in the same color scheme.  I'm excited to get that delivery!!  :-)

I hope you've all had a fabulous week and a wonderful weekend ahead of you!

Recipe:
Solid cardstock from Bazzill
Pattern cardstock from My Mind's Eye Lost & Found 3
Large frame and shadow from Elegant Edges cut at 10.5 inches
Small frame and shadow from Elegant Edges cut at 4.75 inches
Bells from Wedding cut at 3.75 inches
Monogram from Tie the Knot cut at 2.5 inches
Initials from Plantin Schoolbook cut at 1.25 inches

Monday, May 13, 2013

FCCB 160 - Congratulations Graduate

Happy Monday!  Mondays mean a fun new challenge over at Fantabulous Cricut!  This week's challenge is Congratulations Graduate and we want to see you graduation projects!


I made this card for a friend of my sweetie's who is getting his undergraduate degree this Friday.  I wanted to incorporate the school's colors, yellow and blue, into the card somehow.  Because this card is a guy, I decided to go with a couple simple bands of ribbon in the school colors.


I embossed the background paper for a little added interest, wanting to keep the card fairly simple overall since it's for a guy.  Cards for girls are so much easier I think - it's so fun to add glitter, bling and bows!!

Be sure to link up your graduation projects at Fantabulous Cricut by Sunday evening.  We can't wait to see what you come up with!!

Recipe:
Solid cardstock from Recollections and DCWV
Graduation cap from Wrap It Up cut at 3 inches
Sentiment from My Pink Stamper's Happiest Moments set
Ribbon from The Paper Studio
Polka Dots embossing folder
Black embossing powder

Sunday, May 12, 2013

Flower Pot Card

Happy Mother's Day to all of the mothers out there!  I hope you are all able to celebrate in your own special way!!  My mother moved out of state a couple of years ago, so I'm not able to spend the day with her, but I'll be thinking about her a lot.  My sweetie and I are planning to play golf, and I'm hoping my mom is able to do the same!

I have seen a few flower pot cards recently and was inspired to give one a try myself.  I used the Walk in My Garden cartridge for the flower pot and the daisies.


To create the flower pot, I simply cut 2 of the flower pot images, then used adhesive only on the outside edges of the sides and bottom of the pot.


Then I was able to cut a piece of pattern cardstock that would fit inside the flower pot.  I attached my flowers to the top of this piece of cardstock.


I hand trimmed the bottom part of my pattern cardstock so that it would fit inside the flower pot a little better.  Then I cut a piece of white cardstock to layer on top with my stamped sentiment.  The back side of my pattern cardstock is white, so I was able to write a message to my mom there.


Thanks for stopping by to see my creation!  Enjoy the rest of your Sunday!!

Recipe:
Solid cardstock from Bazzill and Recollections
Pattern cardstock from DCWV
Flower pot from Walk in My Garden cut at 3.3 inches
Daisies from Walk in My Garden cut at 2 and 2.25 inches
Swiss Dots and Polka Dots embossing folders
Sentiment from My Pink Stamper's Happiest Moments set
Ribbon from The Paper Studio

Thursday, May 9, 2013

You're Giraffic!

Happy Friday Eve!  I don't know about you, but I'm sure ready for the weekend.  I'm looking forward to some time to relax (aka craft!!) and maybe get out and play some golf too if the weather cooperates.

Last weekend over at the Shop Pumpkin Spice Blog, the design team members each hosted a different challenge.  These challenges were just what I needed to help get my creative juices flowing!  Denine hosted an animal challenge and wants us to create animal cards.  I got the Animal Antics cartridge a while back and thought this challenge would be a perfect opportunity to use it.  I also pulled out my animal-themed stamp sets and this is what I came up with.


I saw this cute giraffe in the hot air balloon and decided I just had to cut him out.


The best part of this card......I used scraps for everything except the card base.  I love when I can use up some scraps!!

Thanks for stopping by to take a look at my card!!

Recipe:
Solid cardstock from Bazzill and Recollections
Pattern cardstock from my stash
Giraffe in hot air balloon from Animal Antics cut at 3.75 inches
Distressed Stripes embossing folder
Sentiment from Pink by Design's Jungle Fever set
White Sakura gel pen

Tuesday, May 7, 2013

You're the Bee's Knees

Good evening!  I think I'm definitely back in my crafting groove!  :-)  I came home from work today and decided that I needed some time in my craft room to relax and unwind from my day.

Over at the Shop Pumpkin Spice Blog this past weekend, they had a lot of challenges in honor of National Scrapbooking Day.  Cheryl is hosting a Things With Wings challenge, so I decided to make a card that would work for her challenge.    I pulled out my stamp sets with puns on them and saw a "You're the Bee's Knees" sentiment and decided to create a card with that.


I found this cute bee on the Create a Critter cartridge and used my Gypsy so I could hide the face cuts and use a Peachy Keen face stamp instead.


I don't have a recipient in mind for this card yet, so I'll add it to my stash.  I figure it will come in handy when someone needs a little pick me up.  :-)

Thanks for coming by to take a look at my creation!

Recipe:
Solid cardstock from Bazzill and Recollections
Pattern cardstock from Teresa Collins Sweet Afternoon
Bee from Create a Critter cut at 3.5 inches
Face from Peachy Keen Stamps Wide Eyed Kids Assortment
Sentiment from Scrappy Moms Stamps Amusing Animals set
Crinkle ribbon
i-rock gems
Swiss dots embossing folder
White Sakura gel pen

Monday, May 6, 2013

FCCB 159 - Mother's Day

Happy Monday!  I hope you all had a fabulous weekend and were able to get some scrappin' done on National Scrapbook Day!

Monday means another fun challenge over at Fantabulous Cricut!  This week's challenge is Mother's Day and we want to see your fabulous Mother's Day cards!

I created this card for my grandma, who loves hummingbirds.  She has a hummingbird feeder on her back patio and she enjoys watching them come to eat.


I found this simple hummingbird image on the Lyrical Letters cartridge - not a cartridge I would have thought to look on for a bird image!  It's always fun when you find hidden images like that, I think!!


I popped the hummingbird up using pop dots to give it a little dimension and added pearls to the centers of the flowers for a little something extra.

Thanks for coming by to take a look at my project.  I'm looking forward to seeing your Mother's Day cards.  Be sure to link them up over at Fantabulous Cricut by Sunday evening!!

Recipe:
Cardstock from Bazzill and Recollections
Hummingbird from Lyrical Letters cut at 2.5 inches
Branch and flowers from Tie the Knot cut at 3 inches
Sentiment from My Pink Stamper's Happiest Moments set
Pearl gems
White Sakura gel pen

Sunday, May 5, 2013

I Do Layout

Happy Sunday!  Are you all enjoying your weekend?  I had an enjoyable day yesterday spending time in my craft room then going out to dinner with my sweetie's family.

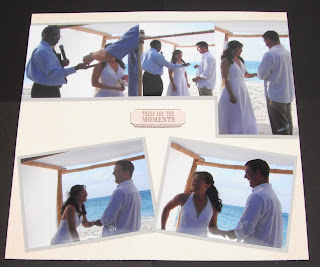
This is one of the layouts I created yesterday - I'm trying to get caught up on my scrapbooking and have been slowly working on my wedding album.  We have an album with all the pictures in it that the photographer took, but so many of our family and friends had fun pictures of our wedding that I decided I wanted to make a scrapbook full of those pictures as well.


These pictures document a moment that my sweetie and I will never forget.  Not just because it's when we exchanged rings, but because the pastor performing our ceremony made it quite memorable.  As you can probably tell from the pictures, we were married on a beach in the Caribbean.  We stayed at a resort that had 16 wonderful restaurants.


In the top right picture above, my sweetie is trying to put the ring on my finger, but my fingers must have been swollen a bit because he was having a hard time getting it on.  The pastor promptly says, "Heather......Heather....you must have been spending too much time in the buffet line!" - which is why we are laughing in the bottom left picture.  In the bottom right picture I'm replying to the pastor, "At least my dress still fits!!"  Such memories, things we will never forget, and why I chose the "These are the moments" accent for this page.


A few more pictures of this portion of the ceremony are on this second page.


I couldn't get a good picture of the rings I cut with my Cricut, but I put glossy accents and glitter on the diamond for a bit of sparkle.  This picture does show the fun texture of the background paper better though.

Yesterday over at the Shop Pumpkin Spice Blog, each of the design team members hosted a different challenge.  Missy is hosting a layout challenge - create a one or two page layout, so I'm going to link this up over there.

Thanks for stopping by to take a look at my pages today!!

Recipe:
Textured Cardstock from My Mind's Eye Lost & Found 3
Solid cardstock from Recollections
I Do from Tie the Knot cut at 2.75 inches
Rings from Sweethearts cut at 2.25
My Mind's Eye Lost & Found 3 Chipboard element

Saturday, May 4, 2013

Belated Birthday Card

Happy Saturday!  Do you have some fun plans for the weekend??  I got my run in this morning, but the rest of my day is pretty free.  The crummy weather here has forced us to alter our plans.  While I'm a bit disappointed, I'm going to look at the bright side - having a pretty free day means I can now spend some time downstairs crafting.  It's National Scrapbook Day and I'm excited to work on some projects!!

Die Cuttin Divas is having an Anything Goes challenge this week.  Perfect for me as I'm getting back into my crafting goove.  I created a pretty simple belated birthday card, sticking with bright primary colors against an embossed white background.


Thanks for stopping by to check out my card!  I'm heading downstairs shortly to get to crafting.  I hope you're able to spend some time scrapping today too!!

Recipe:
Cardstock from Recollections
Balloons from Wrap it Up cut at 3.75 inches
Happy Birthday embossing folder
Twine from My Craft Spot
Sentiment from My Pink Stamper's Fabulous Phrases set
White Sakura gel pen

Thursday, May 2, 2013

Anniversary Card

Hello!  Are you all having a good week??  My week started off great - we had weather in the 80s and I was enjoying some time outside.  Today though, a big turn for the worse..... cold weather, rain and now this evening.....snow!!  In May!!  A very strange occurrence around here!  I thought spring was finally here, but I guess I was wrong!

Anyway, on to my project.....

I made this anniversary card for my grandparents.  If my calculations are correct, they have been married for 66 years now.  Such an inspiration!


I wanted to make something a little different than an A2 card, so I decided to use the scalloped circle card base and layer from the Birthday Bash cartridge.  I thought it went well with the heart image with the scalloped background from the Wedding cartridge.


I'm going to link this card up to this week's Wedding Bells are Ringing challenge over at Bitten by the Bug 2. Thanks for coming by to take a look!

Recipe:
Cardstock from DCWV Shimmer Stack
Scallop card base from Birthday Bash cut at 3.25 inches
Heart image from Wedding cartridge cut at 5 inches
Ribbon from The Paper Studio
Sentiment from My Craft Spot's Happily Ever After set