Saturday, August 31, 2013

Car-shaped Anniversary Card

Good evening!  I hope you all had a wonderful week and have a nice Labor Day weekend ahead of you.  My weekend started off with a nice run with a couple good friends this morning, though it was pretty warm and humid.  We're supposed to be getting a break from this heat wave soon, thankfully!

I wanted to share the card I made for my parents who celebrated their 41st wedding anniversary recently.  I have seen a few other people make a shaped card from the image of the couple in the car on the Sweethearts cartridge and think it's such a fun, cute card.  So I decided to make one myself!


This card came together really easily.  I welded 2 shadow images together on my Gypsy, then cut out the regular image with all the layers.  I found a sentiment that fit well on the bumper and added some Stickles to the heart on the license plate.  Simple but cute!


I also want to take a quick minute to advertise a fantastic challenge that is coming up at Fantabulous Cricut on September 9.  The week of September 9th is going to be Vinyl University Week.  We have a wonderful sponsor - Cricut Vinyl Supplies.

Cricut Vinyl Supplies is offering a 15% discount, on top of their already low prices, to help you prepare for the upcoming challenge.  Just use the discount code: fantabulous and stock up on some vinyl!  On top of that, if we get 100 entries to our vinyl challenge the week of September 9, Cricut Vinyl Supplies will be giving away a Cricut Expression!  How fantastic is that?!?


In addition, we will be having a blog hop to kick off Vinyl University Week and you'll have a chance to win blog candy at every stop along the hop!  Check out Cricut Vinyl Supplies and make sure you have vinyl on hand to play along with us that week!!

Recipe:
Cardstock from Bazzill and Recollections
Car from Sweethearts cut at 4.4 inches
Sentiment from Hero Arts Everyday Sayings set
Stickles

Monday, August 26, 2013

FCCB 175 - Heat Wave

Happy Monday!!  I'm sure you all know what Monday means - time for another fun challenge over at Fantabulous Cricut!  This week's challenge is Heat Wave - create a project using something associated with the summer heat.  This challenge is perfect timing for me here in the Midwest.  We've been pretty spoiled for most of the summer - temperatures haven't been too hot and we've had a few rainstorms here and there.  But the past week or so has been a different story.  It's been hot and humid and it looks like it's going to be that way for at least the next week or so!

Earlier this summer, my sweetie and I went down to the Lake of the Ozarks and stayed with some of his family.  We had a great time out on the boat and playing around the pool.  I made this card thank you card for them.


We spent a good bit of time out on the lake, just floating and relaxing and when I saw this image of the girl floating in the inner tube it reminded me of floating out on the lake.


I embossed the water for some texture and added a tiny crystal gem to the flower on the girl's cap.  I used the hide contour feature on my Gypsy to hide the cuts on her face so I could use one of my cute Peachy Keen face stamps.

Thanks for stopping by to check out my creation! Be sure to link up your summer creations to the Heat Wave challenge over at Fantabulous Cricut by Sunday evening!!

Recipe:
Cardstock from Bazzill, Recollections and We R Memory Keepers
Girl floating from Pack Your Bags cut at 3.5 inches
D'vine Swirls embossing folder
Face from Peachy Keen Stamps Everyday Character Face Assortment
Sentiment from My Pink Stamper's Everyday Life set
crystal gem

Monday, August 19, 2013

FCCB 174 - Summer Camp

Good morning!!  It's time for another fun challenge at Fantabulous Cricut!  This week's challenge is Summer Camp - create a camping theme project.

This card was inspired by my dad, my brother and my sweetie.  Every year they go on a week-long camping trip - a whole week of hiking, fishing and camping.  No electricity, no running water, just them in the great outdoors.  The come back with lots of pictures and stories, and as I was flipping through my Campin' Critters handbook I saw this scene and immediately thought of them.


They head to mountainous areas and always camp near lakes or streams so they have a source of water.  They carry dehydrated food in with them, but they always fish to try to supplement their meals.  The mountain scene with the stream seemed like a perfect background for the little deer fishing!


It's hard to see in the pictures, but I added some glitter to the snow on the mountains.  A bit of embossing on the trees and the water and some fun google eyes on the deer finish it off.  I'm hoping to sneak this in my sweetie's backpack before he leaves on this year's camping trip next week!

The challenge at Fantabulous Cricut stays open until Sunday evening, so link up your camping themed projects before then.  We can't wait to see your fun creations!!

Recipe:
Solid cardstock from Bazzill and Recollections
Mountain scene from Campin' Critters cut at 4 inches
Deer fishing from Campin'Critters cut at 3 inches
Swiss Dots and D'vine Swirls embossing folders
Sentiment from Scrappy Moms Stamps Amusing Animals set
Glitter
Google eyes

Sunday, August 18, 2013

80th Birthday Card

Happy Sunday!  I hope you all had a great weekend!  We celebrated my mother-in-law's father's 80th birthday yesterday.  There were lot of family and friends gathered together and the weather was perfect so we were able to eat and play outside.  A great time was had by all!

I decided to play along with the challenge over at Die Cuttin Divas when I made his birthday card.  Their challenge this week is a color challenge - use orange and white on your project.  I found some fun orange and white pattern papers in my paper collection and got to creating.


Since this card is for a pretty monumental birthday, I decided to make the numbers the focus of the card.  I found these fun candle-numbers on the Sweet Treats cartridge.  I popped the frame up using large pop dots, then popped the numbers up with small pop dots for added dimension.


Thanks for stopping by to take a look at my creation!

Recipe:
Solid cardstock from Bazzill
Pattern cardstock from American Crafts and My Minds Eye
Labels Four Spellbinders dies
Candle numbers from Sweet Treats cut at 1.75 inches
Cloud Corner Chomper
Stickles

Sunday, August 11, 2013

Stamped Cupcake Card

Good evening!  I hope you all had a great weekend!!  My weekend was pretty relaxing, and I managed to get a bit of crafting done, so that's always a good thing.  I've been working on my wedding album a lot lately and I have quite a few pages started, they just need a few more details and embellishments.  I can't figure out exactly what I want to do, so the pages sit off to the side while I wait for a bit of inspiration before adding the finishing touches.  Does that happen to anyone else??

In between working on scrapbook pages I tried to get a few cards done, too.  Die Cuttin Divas is having a sketch challenge this week, and I really like playing along with sketch challenges.  Here is the sketch we were given:


And here is the card I came up with:


This is a Cricut-free card - something that doesn't happen very often for me!!  I used some Spellbinders dies to make the frames for the cupcake.  The cupcake was made by paper piecing a stamped image - something else I don't do very often!


I enjoyed playing along with this challenge this week, and doing a few things that I don't do very often.  It's always fun to be reminded of different techniques, right?!?

Thanks for stopping by to check out my creation!!

Recipe:
Solid cardstock from Recollections
Pattern cardstock from Teresa Collins Sweet Afternoon pad
Cupcake image and sentiment from Hero Arts Cupcakes set
Spellbinders Labels Eight dies
i-rock gems

Monday, August 5, 2013

FCCB 172 - Make a Splash

It's Monday again, and that means it's time for another fun challenge over at Fantabulous Cricut!!  This week's challenge is Make a Splash - create any project with a water theme.  This week, The Paper Nest  was super-generous and gave some of the DT members some digis to play with.  A huge "Thank You" to The Paper Nest!!  This is the first time I've ever used a digi, and I was really excited to give it a try!


When I saw the image of this little boy fishing I knew immediately it was the digi I wanted to use.  My sweetie loves to fish, and I thought of him when I saw this image.  I think I'm going to stash this card away and stick it in his work bag one of these days as a little surprise for him.


I've never colored a digi before - in fact, it's been a long time since I've colored anything!!  I didn't have any fancy markers or anything, but I did have some colored pens and pencils.  I outlined the image with my pens and colored it in with my pencils.  I don't think of myself as a great artist, but I was pretty pleased with how this turned out.  I may have to use some more of these digis!!

We'd love to have you join our Make a Splash challenge this week!  Link up your water-themed creations over at Fantabulous Cricut by Sunday evening.  And check out The Paper Nest for some really fun digis!!

Recipe:
Solid cardstock from Bazzill
Pattern paper from DCWV Stack 7
Card base from Elegant Edges, book feature, cut at 5.5 inches
Frame from Elegant Edges cut at 5.25 inches
Owen Fishing digi from The Paper Nest
Sentiment from Scrappy Moms Stamps Amusing Animals set

Saturday, August 3, 2013

Birthday Present Card

Happy Saturday!  I hope you are having a great weekend so far!  My sweetie got a last minute invite to play golf with a few friends this afternoon.  He was going to pass, but I told him to go - have fun!  Of course I had ulterior motives.....if he went to play golf, I'd be home alone, which means I could get some crafting done!!

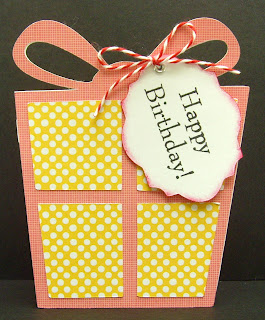
I was inspired to make this card by my DT Sister Amy and the card she made for this week's Shaped Card challenge over at FCCB.  Check her fun card out HERE.  I loved the shape and the fun, shimmery papers Amy used, and she reminded me of the Life's a Party cartridge - a fun one that I haven't used in quite a while.  Here is my take:


I used the card feature on Life's a Party for the card base.  The card feature makes it so easy - no flipping and welding necessary!  :-)


I kept the card pretty simple - it's always tempting for me to try to bling cards up or make them girly in some way.  But this card is going to a guy, so I didn't add much.  I inked the edges of the tag with red ink, tied it to the card with red twine, and called it good!

I'm going to link this card up to the Anything Goes challenge over at Die Cutting Divas.  You still have some time to enter both challenges, so get to creating and link up your projects!!  Thanks for stopping by to take a look!

Recipe:
Pattern papers from American Crafts Hip Hip Hooray pad
Present from Life's a Party cut at 5.347 inches
Tag from Elegant Edges cut at 2.5 inches
Sentiment from TPC Studio Greetings set
Twine from The Twinery