Happy Friday! Do you have some fun plans for the weekend? Maybe some last preparations for Halloween?? My sweetie and I were planning to go up to Ames, Iowa to watch my Iowa State Cylcones play football, but our plans fell through. So all of a sudden, my weekend has opened up, and all I can think is Extra Craft Time!!
Today I'm sharing a quick birthday card. My Imagine sits neglected, right next to my Expression - I'm sure jealous every time my Expression gets turned on. I decided to dust it off to make this card. I forget how fun the Imagine can be with the different pattern papers you can print, how you can print the layers separately, etc.
The background paper for this card was printed with my Imagine, so the colors match perfectly. I print and cut my cupcakes and plate image as one combined layer and also as separate pieces. Then I layered the pieces on top of the combined image using pop dots of different thicknesses for some fun dimension on my card. I tried to capture that in this picture:
Thanks for stopping by to check out my project! Hope you have a great weekend ahead of you!!
Recipe:
Solid cardstock from DCWV
Pattern cardstock printed from Imagine Yummy cartridge
Cupcakes on plate from Imagine Yummy cartridge cut at 3.75 inches
Cloud corner chomper
Crinkle ribbon
Friday, October 25, 2013
Monday, October 21, 2013
FCCB 183 - Home Decor
Happy Monday!! Monday means it's time for a new challenge over at Fantabulous Cricut! This week's challenge is to create a fall or Halloween home decor project, using your Cricut of course!
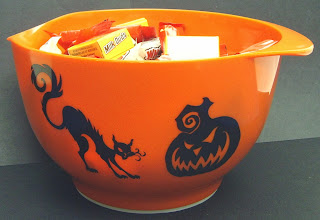
When I heard about this challenge, I knew I wanted to make a fun Halloween candy bowl. I usually just dump candy in a random plastic bowl on Halloween night to pass out as kids come to the door. As I was setting out my Halloween decorations this year, I decided I wanted a Halloween candy bowl that I could set out leading up to Halloween, too. I'm not sure how wise this decision was though, as my sweetie and I have polished off nearly an entire bag of candy by ourselves in about a week!!
I started with this orange mixing bowl I found in the clearance section at Target. Then I started flipping through some of my favorite Halloween cartridges and found a few fun images.
I found this Happy Halloween image with the spider web background on the Mini Monsters cartridge.
The cat and pumpkin are from the October 31st cartridge.
All of the images were cut out of vinyl. I used some transfer tape and was able to easily put the images on the bowl. Fill it up with Halloween candy, and I'm ready to go! Of course, I'll need to buy more candy between now and Halloween! LOL!!
Join in the fun over at Fantabulous Cricut and link up you fall or Halloween home decor projects. This is the perfect time to make a great Halloween accessory or decoration for your home - only about a week until those trick-or-treaters will be ringing your doorbell!
Recipe:
Cat from October 31st cut at 2.5 inches
Pumpkin from October 31st cut at 3 inches
Happy Halloween from Mini Monsters cut at 3 inches
Black and white vinyl
Monday, October 14, 2013
FCCB 182 - Black and Purple
Happy Monday! It's time for another fun challenge over at Fantabulous Cricut!! This week's challenge is a color challenge. We want you to use Black and Purple as the main colors on your project.
My first thought was Halloween - it is right around the corner after all!! I decided to make some mini treat bags.
I saw a tutorial on Pinterest for making bags out of 8 1/2 x 11 paper with no cutting, only folding. Check out the tutorial HERE and some great examples HERE.
I used Create a Critter 2 for all my cuts. I started with this cute spider wearing a witch's hat. I found this spider web paper in Paper Studio pad I have and thought it was the perfect background for this little guy.
I think the vampire bat is another cute Halloween image on the Create a Critter 2 cartridge. And below is one of my favorites - the little owl wearing a witch's hat.
The tags were rectangles of cardstock that i used my corner chomper on to round the corners. Then I punched a hole and put in a grommet using my Crop-A-Dile. I used bakers twine for my handles, feeding it through the grommet on the tag when I attached them to the bags.
The back side of the bags are all the same. I found this image on Create a Critter 2 as well. I covered the letters in Glossy Accents so it would have a fun shine.
These were fun to make and I'm excited to hand out a few special Halloween treats in them!
Be sure to link up your black and purple creations at Fantabulous Cricut by Sunday evening! I'm looking forward to seeing them!!
Recipe:
Solid cardstock from Recollections
Pattern paper from The Paper Studio
Spider from Create a Critter 2 cut at 2.5 inches
Vampire bat from Create a Critter 2 cut at 2 inches
Owl from Create a Critter 2 cut at 2.75 inches
Boo from Create a Critter 2 cut at 2 inches
Sentiments from My Pink Stamper's Spook-alicious set
Bakers Twine
Stickles
Glossy Accents
Saturday, October 12, 2013
Wedding Shower Card
Happy Saturday! I hope you all had a good week and that your weekend is off to a good start. My sweetie's cousin is getting married today, and I realized I did not share the card I made for her shower a couple weeks ago.
This card was inspired by her shower invitation. There was a picture of a bride holding a bouquet and a bow tied around the card. On the invitation, the bow was red and it was at the top of the card, but I didn't have the right color red ribbon on hand, so I went the the black and white instead.
Thanks for stopping by to check out my card! Have a fabulous weekend!!
Recipe:
Cardstock from Recollections
Bride from Sweethearts cut at 3.75 inches
Swiss Dots embossing folder
Ribbon from The Paper Studio
Monday, October 7, 2013
FCCB #181 - Have Your Cake
Happy Monday! It's time for another fun challenge at Fantabulous Cricut!! This week's challenge is Have Your Cake - create a project with a cake or cupcake image.
One of my sweetie's cousins is getting married this coming weekend, and this is the card I made for the happy couple.
Her wedding colors are black, red and white. I like to play off the invitations when I can, but this invitation was pretty basic - black with red and white font and a red ribbon tied in a knot. So I took the colors and ran with it.
I gave the card some fun texture with a couple embossing folders and it's hard to see in the picture, but the red bands on the cake are covered in Glossy Accents so they have a nice shine to them.
Thanks for stopping by to take a look at my creation! Link up your creations with a cake or cupcake over at Fantabulous Cricut by this Sunday evening!!
Recipe:
Solid Cardstock from Recollections
Swirls with Hearts embossing folder
Polka Dots embossing folder
Sentiment from The Scrapbooking Queen's Royal Wedding set
Ribbon from my stash
Glossy Accents
Saturday, October 5, 2013
Happy World Card Making Day!
Hello! I'm sneaking this in right before World Card Making Day ends (in my time zone anyway!!). I got online earlier today and realized that today was World Card Making Day and thought, how can I not make a card today??
As I was surfing around blog-land a bit, I saw Shop Pumpkin Spice's blog hop and current challenge - green and brown. I thought that sounded like a fun challenge, so I headed to my craft area and started looking through my Cricut Cartridges for some ideas. I came across the Love You a Latte cartridge, which I've had quite a while but barely used. Here's what I came up with:
I made this shaped card by cutting two of the base images, scoring the top of the back layer and using adhesive to adhere the two images only at the top.
A simple card, perfect for a coffee-lover! Thanks for coming by to take a look!!
Recipe:
Solid Cardstock from Recollections
Pattern Cardstock from American Craft's Dots and Stripes pad
Coffee cup from Love You a Latte cut at 5.25 inches
Subscribe to:
Comments (Atom)


