Showing posts with label Wedding. Show all posts

Monday, September 22, 2014

FCCB #229 - Sketch Challenge

Welcome to another Challenge Me Monday at FCCB!


Challenge #229 Sketch

This Weeks Sponsor

SVG Attic

$10.00 Giftcard
~This Weeks Challenge~
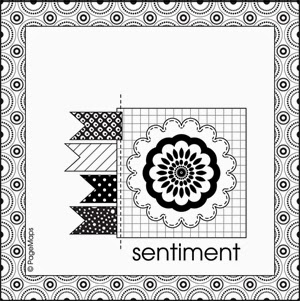
Sketch Challenge


I used this sketch as inspiration for the last page in my wedding album.  I had to tell my husband, it's the last page physically in the album, not the last page I have to make - LOL!


I made a 6.5 x 6.5 inch envelope and instead of folding the top flap down like you would to seal an envelope, I tucked it inside.  This gave me a square pocket, where you can see a bit of the same paper I used for the background peeking through at the top.  Then I cut a smaller square of paper and adhered it to my envelope and added the bride and groom image from the Wedding cartridge.  This created a pocket where I put a DVD with the video from our wedding ceremony.  I found the font for my sentiment on the Something to Remember cartridge.  A pretty simple page, but I really like it!

I hope this sketch will inspire you to create something wonderful and that you'll join in the fun at FCCB this week!  Remember, to qualify for the prize, be sure to use at least 1 Cricut cut on your project and if it's not obvious, let us know what cartridge you used.  Thanks for stopping by!

Monday, April 14, 2014

FCCB #206 - Sketch Challenge

 Happy Monday and welcome to another Monday challenge at FCCB!


Challenge #206 Sketch Challenge

This Weeks Sponsor

Winner will receive 3 Digital Images.


~This Weeks Challenge~
Sketch Challenge
Create a project inspired by the following sketch:
Sketch is from Card Positioning Systems

Here is the card I came up with, based on this sketch:


One of my sweetie's cousins got married last month in Jamaica and they just had their reception this past weekend.  Their wedding colors were coral and grey, which inspired my paper choices for this card.


I popped the smaller frame up off the card using regular pop dots, then I popped up the bride and groom using thinner pop dots, for a little extra dimension.

I hope this sketch gives you some inspiration for a project this week!  Link up over at FCCB, and remember, to qualify for the prize you must to use at least 1 Cricut cut on your project and if it's not obvious, let us know what cartridge you used.  Thanks for stopping by today!

Recipe:
Solid cardstock from Recollections
Pattern cardstock from American Crafts Color Crush pad
Bride and Groom from Wedding cut at 3.125 inches
Fiskars Apron Lace border punch
Crinkle ribbon
Button


Monday, June 17, 2013

FCCB 165 - Wedding Days

Happy Monday!  It's time for another fun challenge over at Fantabulous Cricut!!  This week's challenge is Wedding Days - we want to see your wedding card or gift creations!

I created this card for my step-niece's wedding.  The blue background paper is actually from her invitation.  The top half of the invitation was blank and had a black satin ribbon tied around it.  I was able to cut off the portion of the invitation with the printing on it and use the blank half for the background of the card.


I love this silhouette couple on the Wedding cartridge.  I decided to cut the image out twice, once in black and once in white shimmer paper, then cut just the dress portion from the white shimmer cut for the bride's dress.  The image had small round cuts down the back of the dress, but I hid those using my Gypsy and instead put small gems.  I also highlighted the cuts on the dress using my Star Dust gel pen.


I used black satin ribbon from my stash on the card.  This ribbon is thinner than what was tied around the invitation, but that's of course where my inspiration came from!  I hope my step-niece likes her card that was inspired by (and partially stolen from!) her invitation.  :-)

Link up your wedding creations over at Fantabulous Cricut by Sunday evening.  I'm looking forward to see all your fabulous creations!!

Recipe:
Solid cardstock from Recollections and DCWV
Bride and Groom from Wedding cut at 3.75 inches
Sentiment from My Craft Spot's Happily Every After set
Ribbon from my stash
Crystal gems
Star Dust gel pen

Friday, May 17, 2013

Wedding Album Cover Page

Happy Friday!  This has been a busy week for me and my sweetie and I have some fun plans for this weekend, so I'm doubly excited for Friday this week!!

As you may already know, I've been trying to get caught up on some of my scrapbooks lately.  One of the albums I've been slowly working on is an album of wedding pictures that family and friends took.  Faith Abigail did a wedding album series just a little while back.  I think she puts together fabulous layouts and was so excited to see her wedding album series since I'm working on my wedding album.  She put together a fabulous cover page for the album that you can see HERE.  When I saw her cover page I knew I was going to be scraplifting her design for my wedding album - I just loved it!


I basically kept all of the elements the same.  I think the only thing I changed was the font for our initials and the papers.  I really like the soft colors in the My Mind's Eye Lost & Found 3 papers, so I've been using those throughout my album. I recently placed an order for some scrapping supplies that includes some papers in the same color scheme.  I'm excited to get that delivery!!  :-)

I hope you've all had a fabulous week and a wonderful weekend ahead of you!

Recipe:
Solid cardstock from Bazzill
Pattern cardstock from My Mind's Eye Lost & Found 3
Large frame and shadow from Elegant Edges cut at 10.5 inches
Small frame and shadow from Elegant Edges cut at 4.75 inches
Bells from Wedding cut at 3.75 inches
Monogram from Tie the Knot cut at 2.5 inches
Initials from Plantin Schoolbook cut at 1.25 inches

Thursday, May 2, 2013

Anniversary Card

Hello!  Are you all having a good week??  My week started off great - we had weather in the 80s and I was enjoying some time outside.  Today though, a big turn for the worse..... cold weather, rain and now this evening.....snow!!  In May!!  A very strange occurrence around here!  I thought spring was finally here, but I guess I was wrong!

Anyway, on to my project.....

I made this anniversary card for my grandparents.  If my calculations are correct, they have been married for 66 years now.  Such an inspiration!


I wanted to make something a little different than an A2 card, so I decided to use the scalloped circle card base and layer from the Birthday Bash cartridge.  I thought it went well with the heart image with the scalloped background from the Wedding cartridge.


I'm going to link this card up to this week's Wedding Bells are Ringing challenge over at Bitten by the Bug 2. Thanks for coming by to take a look!

Recipe:
Cardstock from DCWV Shimmer Stack
Scallop card base from Birthday Bash cut at 3.25 inches
Heart image from Wedding cartridge cut at 5 inches
Ribbon from The Paper Studio
Sentiment from My Craft Spot's Happily Ever After set


Saturday, July 28, 2012

Wedding Card

Happy Saturday!  My sweetie and I are enjoying some R&R at the lake with some family.  Loving the getaway!!

Before we left, I made a card for some good friends of ours.  They are getting married in Virginia Beach in about 10 days and we are so excited for them!  We're getting together with them next week so that we can wish them well before their big day.  I'm going to submit this card into the challenge over at Fantabulous Cricut - perfect timing for them to have a 'Wedding Bliss' challenge!  :)

Thanks for coming by and I hope you're all having a wonderful weekend!


Recipe:
Cardstock from Bazzill and Recollections
Frame from Elegant Edges cut at 3.75 inches
Bride and Groom from Wedding cut at 2.75 inches
Sentiments from My Craft Spot's Happily Ever After set
Ribbon from The Paper Studio
Star Dust Sakura gel pen
Devine Swirls embossing folder

Wednesday, July 18, 2012

Anniversary Card


Happy Wednesday!  I found some time this past weekend to get downstairs and do some crafting.  There were some cards I needed to get made so I could get them out in the mail.  I'm hoping to get some inspiration and motivation and make it back down there later this week and weekend.  With the heat they're forecasting for us this weekend, the basement is probably the best place for me to spend my time!!

My brother and his wife celebrated their 13th wedding anniversary yesterday.  This is the card I made for them in honor of the occasion and to wish them a fabulous fourteen year of marriage!  I love the champagne glass images for anniversaries for some reason, and there are a number of them to choose from on various Cricut cartridges.  A pretty simple card, but I was pleased with how it turned out.  Thanks for stopping by to take a look!!


Recipe:
Cardstock from Bazzill and Recollections
Champagne glasses from Wedding cut at 2.5 inches
Frame from Elegant Edges cut at 5 inches
Glossy Accents
Pop Dots

Saturday, June 16, 2012

Glass Luminaries

Good evening!  I hope you are all having a great weekend!  We're having great weather here, and I've been taking advantage of it - getting outside to run, watch my sweetie's cousins play softball games, and working in the yard.  I also got a project done today that I've been thinking about doing for a while now.

I saw a project on the Cricut Circle blog a while back where luminaries were made out of recycled glass jars.  I decided to make something similar for my sweetie and I, based on our wedding.  I found some cheap glass vases at a home store near us and decided to use them.  I cut vinyl and adhered it to the glass jars.  On the first vase I put a bride and groom image on one side, and intertwined rings and our wedding date on the other.  On the second vase I put a sand dollar image on one side (we had a beach wedding and my sweetie found 6 sand dollars while we were there), and the site of our destination wedding (Turks and Caicos) on the other.

Then we sprayed both vases with frosted glass spray paint.

Next I carefully peeled off the vinyl, using an exacto knife to help get the edges started.

Finally, I added a tea light candle and turned out the lights!  

The pictures didn't turn out the greatest, but hopefully you get the idea.  We're so pleased with the final product, and love the way they look both with the candles lighting them up and without.  And the best part.....this was really a very easy project!  This was my first time using vinyl, so I was a little worried about how to cut it, how to get it on the glass, etc, but it was really simple.  :)

Thanks for coming by to take a look and enjoy the rest of the weekend!!

Recipe:
Glass vases
Vinyl
Frosted Glass spray paint
Bride and Groom from Wedding cut at 3 inches
Rings from Wedding cut at 2 inches
Date from Plantin Schoolbook cut at 1 inch
Sand dollar from Life's a Beach cut at 2.75 inches
Destination from Lyrical Letters cut at 1 inch

Sunday, October 16, 2011

CTO #34

Hello again!  Yes, two posts in one day is a lot for me, but there's a challenge over at Celebrate the Occasion that ends tonight that I wanted to be sure to enter.  The challenge this week is any occasion, but you must use the colors red, black and white.  My future father-in-law is getting married in less than four weeks and their colors are maroon, cream and touches of black.  How perfect for this challenge!!  I decided to get their card made so that it would be ready to go and of course wanted to create something that used their wedding colors.  This is what I came up with.  Thanks for coming by to take a look!
Recipe:
Cardstock from Bazzill and Recollections
Flower bouquet from Wedding cartridge cut at 3 1/4 inches
Ribbon loop border punch
Sentiment from My Pink Stamper's Happiest Moments set
White sakura gel pen
Black embossing powder
Glossy accents on the flowers and ribbon
