Good evening! I hope you all had a nice weekend. Mine was very busy between holiday parties and trying to get various projects wrapped up. My Christmas cards are nearly done and just about ready to put out in the mail, and I also managed to get a gift card created.
I knew I wanted to participate in the challenge this week over at Fantabulous Cricut - Bells are Ringing. I got some inspiration from a number of gift card holders I've seen on blogs and Pinterest recently, and also from one of the FCCB Design Team Members, Missy.
I folded a piece of 6.5" x 4.5" cardstock in half and glued the two side together, leaving the top open.
I used the Book feature of the Elegant Edges cartridge to cut the tag and punched a hole in the top, tying a bow with crinkle ribbon. I tied a jingle bell to the bow - thanks for the idea of using an actual bell Missy! There you go, gift card holder complete - just decorate as you wish!
Recipe:
Pattern and glitter cardstock from DCWV
Solid cardstock from Recollections
Jingle bells from Wrap it Up cut at 2.5 inches
Crinkle ribbon
American Crafts twine
Jingle bell
Sunday, December 16, 2012
Wednesday, December 12, 2012
Gift Bags
Hello! Can you believe Christmas is less than 2 weeks away?!? Are you ready?? We are nearly finished shopping, but I've only just started our Christmas cards. I'm hoping to get them finished up by the weekend and in the mail by Monday - wish me luck!!
Today I am sharing a gift bag I made using a tutorial I had found quite a while ago. I have seen a number of people make bags like this, most recently Gigi over at The Cricut Bug. You can find the tutorial for making these bags HERE. The bags are easy to make and work perfectly for those small gifts you're giving - I'm putting soft fuzzy socks in them.
I'm going to link these up to this week's Wrap it Up challenge over at My Craft Spot and also to the Thankful Thursday Red and/or Green challenge at DL Art. Thanks for coming by to take a look!
Recipe:
Pattern and glitter cardstock from DCWV
Snowman from Jolly Holidays cut at 3 inches
Face from Peachy Keen Stamps Winter Faces Assortment
Fiskars Threading Water border punch
Crinkle ribbon
Today I am sharing a gift bag I made using a tutorial I had found quite a while ago. I have seen a number of people make bags like this, most recently Gigi over at The Cricut Bug. You can find the tutorial for making these bags HERE. The bags are easy to make and work perfectly for those small gifts you're giving - I'm putting soft fuzzy socks in them.
I'm going to link these up to this week's Wrap it Up challenge over at My Craft Spot and also to the Thankful Thursday Red and/or Green challenge at DL Art. Thanks for coming by to take a look!
Recipe:
Pattern and glitter cardstock from DCWV
Snowman from Jolly Holidays cut at 3 inches
Face from Peachy Keen Stamps Winter Faces Assortment
Fiskars Threading Water border punch
Crinkle ribbon
Monday, December 10, 2012
Christmas Card Holder
Good evening! I hope you all had a wonderful weekend and that your week is off to a good start. My weekend was busy, but also productive - I managed to get quite a bit of crafting done!
One of the projects I completed this weekend was a Christmas card holder. My sweetie and I didn't have a good way to display Christmas cards that we have received. I saw a creation on Pinterest that I thought would be great - a wreath made out of painted clothes pins on wire shaped in a circle. Have you seen the one I'm talking about?
Cute, huh? Well, I got the clothes pins, painted them, strung them on the wire, tied my bow.....all was going fine until I tried to get it on my wall. No luck. I just couldn't get the clothes pins to behave, my circle turned in to an oval, and it just looked all wrong. Ugh! So, back to the drawing board (also known as Pinterest and Google LOL!!).
I got some inspiration and this is what I created:
I am much happier with how this turned out! (Sorry for the bad lighting in the pics - it's been cloudy here the past few days so the light wasn't good). I cut the frame shape twice out of thicker cardstock and glued the ribbon that will hold the cards between the two pieces. To hang my sign, I punched two holes with my Crop-A-Dile Big Bite and reinforced them with eyelets, then tied a ribbon through them to create my hanger.
I am going to link this up to the Holiday Choice challenge over at Decorate to Celebrate. Thanks for coming by to take a look!
Recipe:
Solid cardstock from Recollections
Pattern and glitter cardstock from DCWV
Frame and shadow from Elegant Edges cut at 11 inches
Seasons Greetings from Celebrate with Flourish cut at 4 inches
Presents from Winter Frolic cut at 2 inches
Ornament from Winter Frolic cut at 2.3 inches
Stocking from Jolly Holidays cut at 2.3 inches
i-rock gems
White Sakura gel pen
Ribbon
Friday, December 7, 2012
Christmas Gift Bag
Good evening! I've had a busy week at work and have been trying to get various things done around the house this week, so I haven't been able to craft too much. What's new, right?!?
Well, my brother is coming to visit tomorrow and I'm hoping to have all the Christmas presents for his family wrapped and ready to go so that I can send them home with him when he leaves. I have the packages wrapped, but I needed a gift bag for one of the gifts we're giving my niece. I dusted off my Imagine and got to creating!!
This is the first time I've attempted to fill an image from a regular Cricut cartridge with a pattern from an Imagine cartridge. Very easy - something I will definitely need to keep in mind for future projects!!
I'm going to enter this bag into Holiday Spirit challenge over at Die Cuttin Divas. Now I'm off to try to get started on my tags so I can get these packages finished up!! Thanks for stopping by!
Recipe:
Kraft bag
EK Success snowflake border punch
Pattern papers printed from Christmas Wish Imagine cartridge
Mittens from Simply Charmed cut at 4 inches
Glitter
Buttons from my stash
Twine from My Craft Spot
Well, my brother is coming to visit tomorrow and I'm hoping to have all the Christmas presents for his family wrapped and ready to go so that I can send them home with him when he leaves. I have the packages wrapped, but I needed a gift bag for one of the gifts we're giving my niece. I dusted off my Imagine and got to creating!!
This is the first time I've attempted to fill an image from a regular Cricut cartridge with a pattern from an Imagine cartridge. Very easy - something I will definitely need to keep in mind for future projects!!
I'm going to enter this bag into Holiday Spirit challenge over at Die Cuttin Divas. Now I'm off to try to get started on my tags so I can get these packages finished up!! Thanks for stopping by!
Recipe:
Kraft bag
EK Success snowflake border punch
Pattern papers printed from Christmas Wish Imagine cartridge
Mittens from Simply Charmed cut at 4 inches
Glitter
Buttons from my stash
Twine from My Craft Spot
Tuesday, December 4, 2012
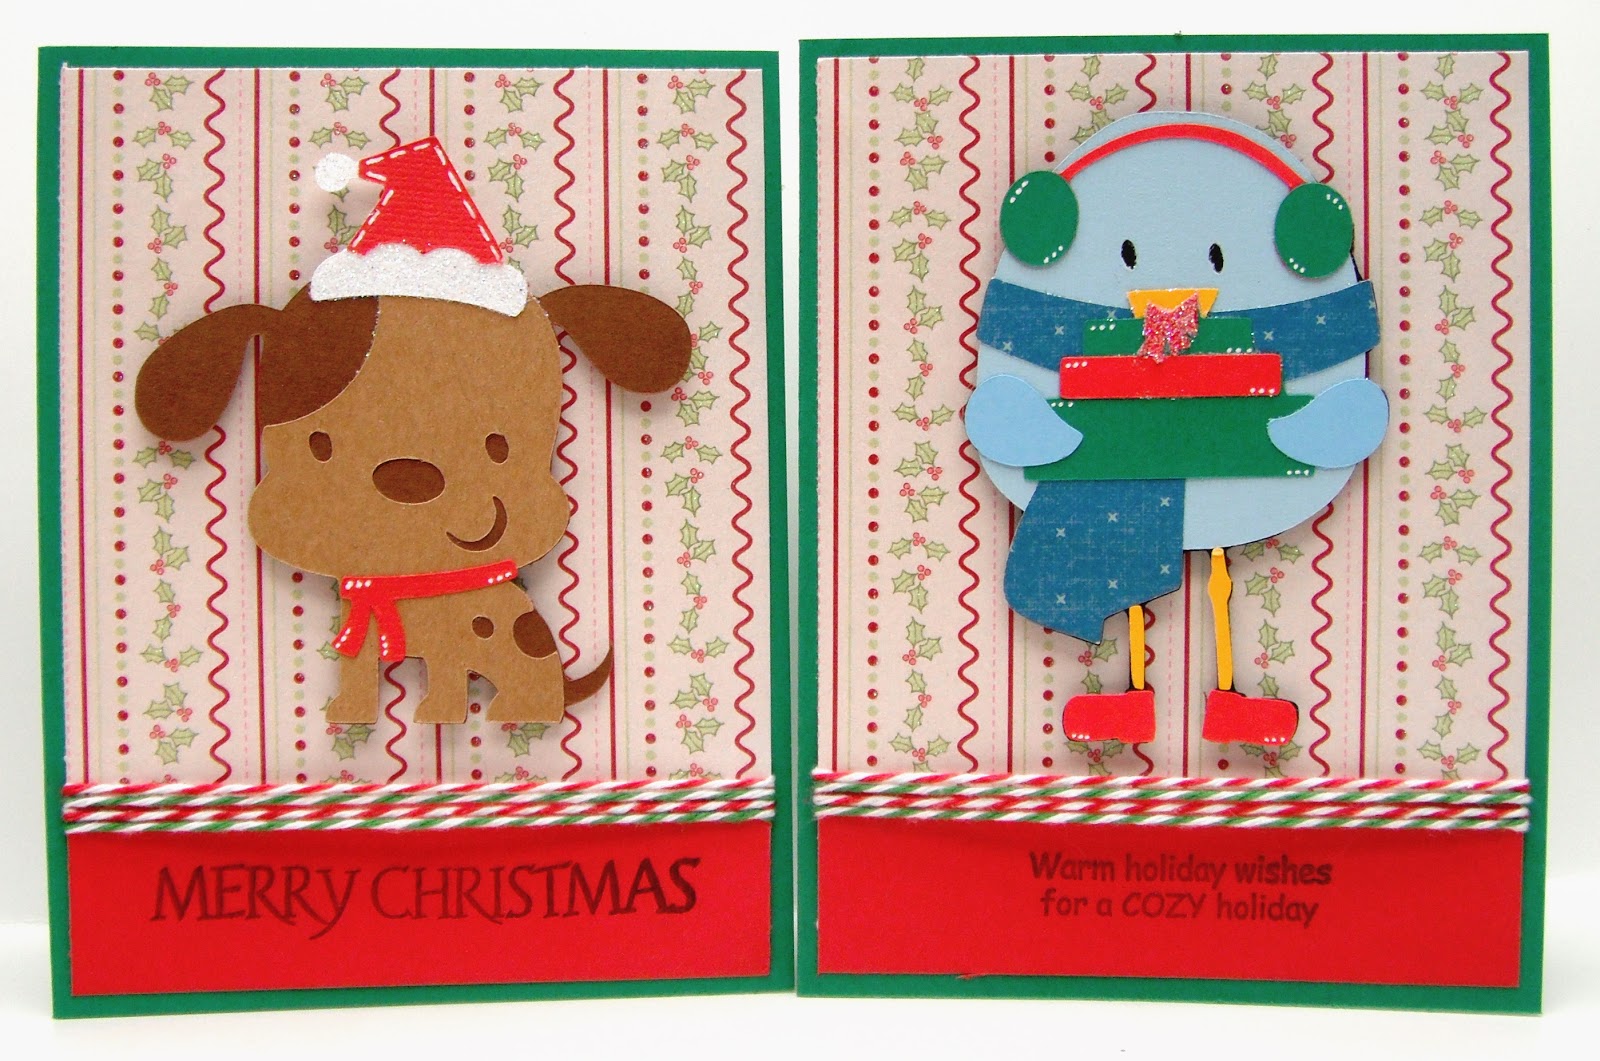
IFTL Christmas Cards
Good evening!! Have you all been busy preparing for the holidays?? I love this time of year! It's a little hard getting in to the spirit though because where I live we're experiencing unseasonably warm weather. I'm not used to 60+ degree temps in December! I definitely want at least some snow this year (perhaps a white Christmas?!?), and I would also like some colder weather so that I can get some use out of the scarves and hats I've crocheted this fall!
My weekend turned out to be a bit busier than I'd expected so I didn't get to spend much time crafting. I did get some time last night though and I created a couple of Christmas cards to send to Madison's I Feel the Love project. If you aren't familiar with her project, please visit her blog HERE. She is collecting Christmas cards that will be taken to Children's Hospital Central California and delivered to children who will be spending the holidays there.
I think Madison has such a wonderful heart and collects cards for wonderful causes. Thank you Madison!! You still have time to send some cards Madison's way!!
Recipe:
Solid cardstock from Bazzill and Recollections
Pattern paper from Heidi Grace Designs
Santa puppy from Create a Critter 2 cut at 3.5 inches
Bird with presents from 3 Birds on Parade cut at 3.5 inches
Twine from My Craft Spot
Sentiments from Pink by Design's Christmas Wishes and Hero Arts Holiday Sayings sets
White Sakura gel pen
Glitter
My weekend turned out to be a bit busier than I'd expected so I didn't get to spend much time crafting. I did get some time last night though and I created a couple of Christmas cards to send to Madison's I Feel the Love project. If you aren't familiar with her project, please visit her blog HERE. She is collecting Christmas cards that will be taken to Children's Hospital Central California and delivered to children who will be spending the holidays there.
I think Madison has such a wonderful heart and collects cards for wonderful causes. Thank you Madison!! You still have time to send some cards Madison's way!!
Recipe:
Solid cardstock from Bazzill and Recollections
Pattern paper from Heidi Grace Designs
Santa puppy from Create a Critter 2 cut at 3.5 inches
Bird with presents from 3 Birds on Parade cut at 3.5 inches
Twine from My Craft Spot
Sentiments from Pink by Design's Christmas Wishes and Hero Arts Holiday Sayings sets
White Sakura gel pen
Glitter
Friday, November 30, 2012
Another Birthday Card
I have another masculine birthday card to share with you today - and one I made with no Cricut cuts! I cut strips of paper 1.5 inches wide, then hand cut the ends to make the banners. I added a ribbon and sentiment to finish the card. Very simple! I kept looking at the card wanting to add something, but was afraid anything I added would end up being too much - or too girly!!
Thanks for coming by to take a look! I hope you all have a wonderful weekend!
Recipe:
Solid cardstock from Bazzill and Recollections
Pattern cardstock from DCWV
Ribbon from my stash
Sentiment from Scrappy Mom's Everyday Greetings set
Thursday, November 29, 2012
Birthday Card
Good evening! I don't know where this past week has gone!! I managed to get all our Christmas decorations up over the weekend and there are a few other projects my sweetie and I have been working on around the house, so the time is just flying by!!
There are a couple birthdays in my family this week, and they are both guys. As you may remember from previous posts, I struggle with masculine birthday cards. I think I did okay with these ones though - what do you think??
Here is the first one I made:
I kept it pretty simple and the only bling I added was the Stickles on the candle flames. :-) I'll be back to share the second card with you soon - hopefully tomorrow!! Thanks for coming by to take a look!
Recipe:
Cardstock from Bazzill and Recollections
Candles from Birthday Bash cut at 2.75 inches
Sentiment from Scrappy Mom's Everyday Greetings set
Twine from My Craft Spot
Stickles
There are a couple birthdays in my family this week, and they are both guys. As you may remember from previous posts, I struggle with masculine birthday cards. I think I did okay with these ones though - what do you think??
Here is the first one I made:
I kept it pretty simple and the only bling I added was the Stickles on the candle flames. :-) I'll be back to share the second card with you soon - hopefully tomorrow!! Thanks for coming by to take a look!
Recipe:
Cardstock from Bazzill and Recollections
Candles from Birthday Bash cut at 2.75 inches
Sentiment from Scrappy Mom's Everyday Greetings set
Twine from My Craft Spot
Stickles
Subscribe to:
Posts (Atom)